Using vinyl cutter for origami: practical guide
You may heard about people using some very complex tools for their origami. While they would tell you their methods in general, there are still a lot of obscurity around the topic. Let’s talk about vinyl cutters, also known as CNC-cutters or even as novel scrapbooking tools.
How does vinyl cutter or scrapbooking correspond to origami?
It may sound surprising, but vinyl cutter can be used for origami… Let’s think about a paper folder dream: have someone pre-crease the crease pattern for you so that you could focus on folding. It comes especially handy, if the reference points are not well-findable. By well-findable I mean being on a standard, say square/triangular, grid. Tessellations also require plenty of similar creases. Curved folds also cause a lot of confusion.
The CNC cutters have an ability to plot your lines to the paper. They do that either with a knife or with a ball point pen (that can be empty and leave no color trace, only the pre-crease). After this procedure you have your crease lines on the paper, so they are easier to find. I am not a big fan of using a ballpoint pen (some people are), so I’ll talk mainly about the knives and how to use them.
Can I do any type of origami with such a machine?
Not exactly. I doubt it would be possible to pre-score tissue or other kind of thin paper with this technique. It’s too thin. The good thickness starts from Tant and thicker. I could have good results with printer paper too, although I would not recommend it for origami in general.
Pre-cut paper is really good for corrugations that do not reach 180˚ angles of fold. If you do reach those angles (think of it like a flat fold) and there’s any tension applied to those regions, then the paper may rip in those places. The same is true about kinds of origami that require reverse folds of the same regions many times back and forth. You either need to remake the folding sequence to avoid reversing the same crease too many times or this kind won’t fit this technology well. Of course with flat (and hence straight!) folds you can just skip some of them during pre-crease and then add them manually with an origami scoring tool or just fold those areas on the go. With manual pre-scoring you don’t cut, but press, so the paper won’t rip that easily.

Which machines do I have?
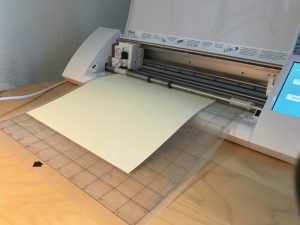
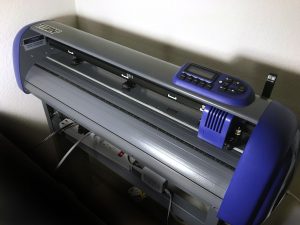
I am a proud owner of two. My first, Silhouette Cameo, designed for scrapbooking, was serving me pretty good (and still does), but I wanted to get more than 12 inch of cutting width. So I started to search for a new one. My new one is vinyl cutter called USCutter Titan-2, but before buying it I had a lot of questions. I summarised my own answers in this article.
What machine to get?
There are many different machines in the market which can have very different characteristics and features. The price range is also very wide: from $200 for a small scrapbooking device to $7000 and up for a huge professional vinyl cutter. The cutting width of such machines ranges from 12-68 inch (30 cm) t0 68 inch (172cm). There are also smaller (than 12 inch) sizes available, but they are less suitable for origami.
Let’s have a closer look on some of the useful vinyl cutter features.
Mat
Some cutters use mats to cut. Mat is a special piece of rectangular plastic that usually comes (or not comes) with the cutter. It has tacky surface, so you can stick your paper to it and cut. Mats are usually provided with the cutters designed for scrapbooking (Silhouette, Curio), because without a mat you can’t cut all the way through paper.
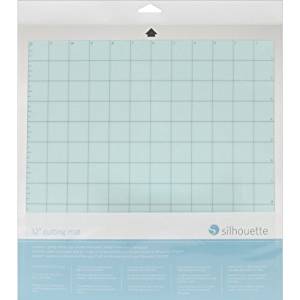
You need not forget that mats are consumables. Depending on how and how often you use the cutter your mat becomes unusable. The sticky layer becomes dirty from dust and paper, so at some point it won’t hold the stuff well. There are tutorials on net about how you can clean it and spray it with some glue, but I’ve never tried that. I guess mat life becomes really short if you cutting felt-like textures, which is not the case of origami. The price of new Silhouette mat is about $10, and even with my big amount of cutting I won’t need to change it more than twice a year.
Side note: if you are not going to cut, you probably don’t need a mat…
Mat-less vinyl cutter
Bigger, pro, vinyl cutters don’t usually come with a cutting mat. It’s mainly because they are designed to cut vinyl. And Vinyl comes with ‘mat included’, meaning that it has 2 layers and only the upper layer is being cut.
Why you still might need a mat for a vinyl cutter?
If you’re feeding the paper inside the machine and cutting only half way through it, you’ll still get about 2 inch(~5cm) side area that it can’t cut. And about 3 inch area in the last part of your paper. The borders can be smashed by a carriage, since nothing holds them in place. And the last part gets wasted because the rollers need to have some area to manipulate the sheet and you can’t cut in those areas. There are several solutions for that:
-
Solution A:
Use a cutting mat. I still use my 12 inch mat with my bigger machine, when I need to cut the small sheets. It works perfectly for paper squares up to 10 inch (remember, it needs some space in the ‘end’ to hold the paper). Or you can probably buy one of those huge cutting mats. They have sizes up to A1. I thought I even ordered one, when I discovered solution B. Only later I discovered that I did not complete a transaction of buying the mat.
-
Solution B:
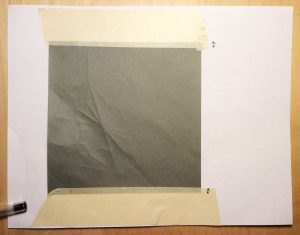
Make a mat yourself. I found a piece of plastic poster board, which is huge enough to be my cutting mat. You can search for it in a craft store (I got mine for about $5). I simply tape my sheets onto it with artist tape. It works. So you only waste a piece you put tape to, which can be as small as 1cm in total from all the sides. Since the poster board is from plastic-like material, artist tape does not hurt it when you remove it.
The huge drawback of this semi-mat: you can’t cut all the way through, as you could with cutting mat… The tape holds the sheet’s borders, but does not support the center in any way. Maybe there’s a way to make it sticky, but I’ve never tried that.
Motor
I am not a specialist in motors, really. But there’s a difference you can feel, mainly with your ears ;).
Cheaper cutters have stepper motors, more expensive ones can have servo motor. If you cut a lot and you don’t like terrible noise, you have to invest in servo. I don’t regret a single dollar that I paid to get the more expensive one, since my Silhouette produces very nasty sound. I’d describe that sound as a song of metal and concrete. I could sustain this sound (I was obsessed by creation process), but not my husband, staying in the same room. Now he tells me he would hear it from another room too. Before the new machine he was gentle enough to keep silence about that. My new machine with servo motor produces the amount of noise compared to laser printer. Pretty quiet compared to previous. I really enjoy that.
I did a short video with working vinyl cutters so that you could get the idea about the nature of the noise both motor types produce. I would find Cameo’s noise not only loud, but particularly annoying.
Software
If you choose the model for you be sure to check the software compatibility. Not every cutter is designed to work with MacOS, while most of them work with Windows.
Cutters usually come with a special software. Software is different. You might want to check the file formats you need to feed into this software. If it’s .pdf it’s very comfy, you can download pdfs from internet, share them with friends, do everything. My previous basic Silhouette software would not read pdfs (well it would if you pay $50 on top for a special plugin). I did not find fair practice of charging extra for file compatibility (the most popular file type btw!) so I would use .dxf format for that instead. I do not want to support such pricing practices. Including that that to the price so that the user compares cutters with their full price would be more fair…(the whole cutter would cost $250 at that time).
Workflow
I use Adobe Illustrator (AI) for drawing, I’m just used to it for my books and diagrams. It’s a paid software and I am sure you can find free analogs that would support basic origami needs. So my workflow starts with .ai files.
- My previous workflow: .ai –> (export as .dxf) –> cutter software
- My current workflow: .ai –> .pdf –> cutter software
Pdf workflow is nicer, since you can store everything in a single pdf, with captions and copyrights. And everyone can read this file on their computer without special software.
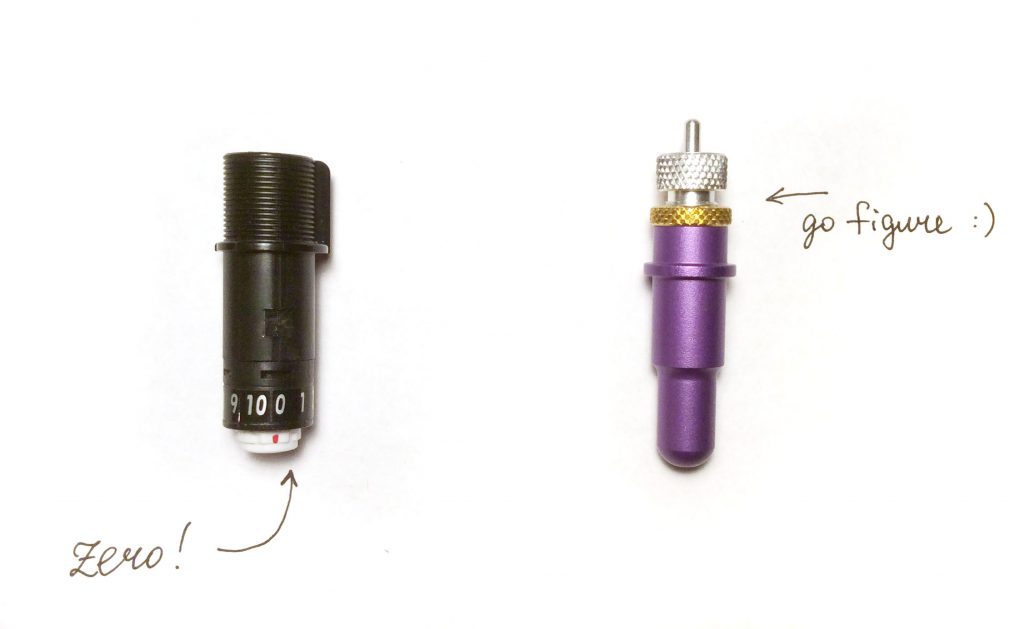
Blade
This is the most tricky part after you have a vinyl cutter. I know a lot of people would have difficulties in this part. You need to adjust your blade for proper pre-creasing.
- With Silhouette blade it’s a lot easier: you set the blade to 0 (zero!) position and it still normally should be a bit of a blade showing up. Then you adjust “material thickness” in your software to get the desired cut depth. It was about 10 for tant, although it does vary depending on the blade! When the blade dulls over time you might need to adjust it.
- USCutter does not have any marks on the blade. It’s the “pro” cutter and needs you to be a “pro” to adjust the blade. First thing you need to do is to completely ignore their blade adjustment instruction! They made it for cutting vynil, not for pre-creasing paper. You need your blade to be showing very-very slightly, so that even with the highest pressure it won’t cut through your material. Oh yes, I adjusted it for tant, since it’s my favorite paper for tessellations. It appears that the same blade adjustment works very well for stardream too. I’ve spent 30 minutes trying to adjust mine, but it was worth doing 😉 Once you find the position, just don’t change it 😉
Conclusion?
I hope, I unveiled the mystery of vinyl cutter at least a bit. If you have any practical questions, be sure to ask in comments, I’ll try to answer 😉 If you are not ready to try this hi-tec, be sure to check the article about manual paper pre-scoring for origami.
9 Replies to “Using vinyl cutter for origami: practical guide”
I have read this article . It’s very nice and informative .
Thank you!
I was wondering if anyone in the origami community was using an electronic cutting machine! I knew they would be useful for origami somehow. Thanks for answering my question
Sure!
Many people do, not many actively say about that because of strange attitude some people have towards automation. Like if it is automated it’s not art anymore? Not handmade anymore? I’ve seen that attitude 😉
can i use plotter to emboss degins on paper ranging from 60 gsm to 250 gsm
I can’t really tell, you will have to research it for yourself. I am very unsure about vinyl cutter per se, as they are designed for cutting vinyl, i.e. very thin material. But some of the cnc cutters for scrapbooking can emboss. You can try researching products by Silhouette, I guess they had some embosser.