How to make origami pictures perfect
I was asked how I make my origami pictures. Actually, it’s easy to make origami pictures and I am going to share my high-tech with you 🙂
I would be talking about white background photographs that are ready to use for books and any other publishing purposes. I would not cover creative shots when people play with various backgrounds. Of course you can take my technique and play with backgrounds.
What I use
- White background – a piece of white project cardboard which I got from Dollar Tree for $1. You can use any other background too. I recommend having a huge sheet, so that you could bend it and create a smooth transition (so that you don’t have any horizon line in some pictures).
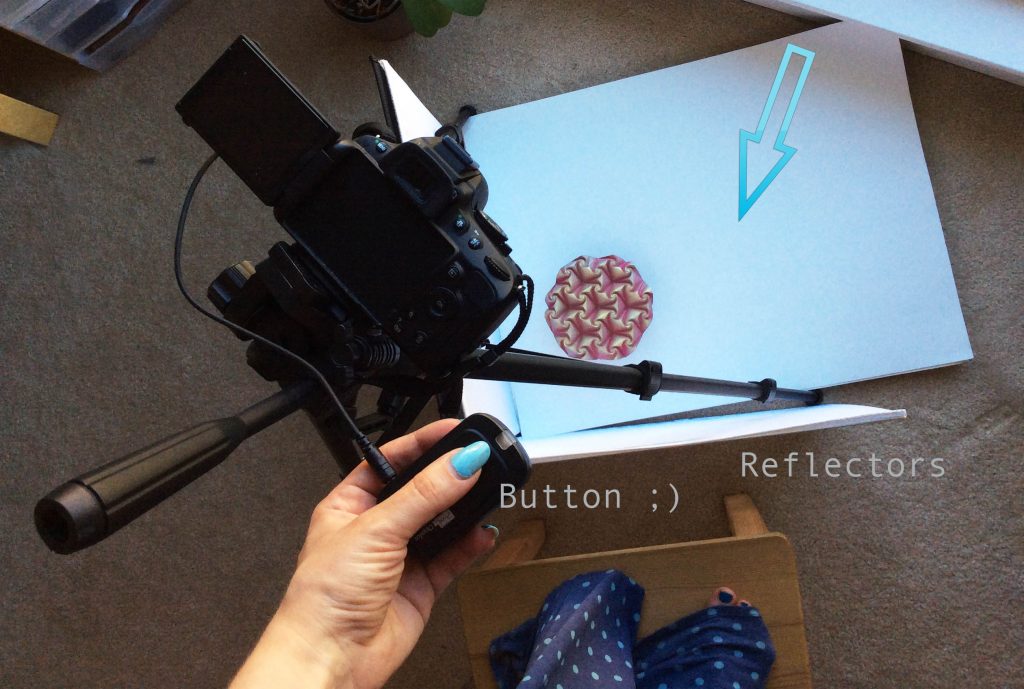
- Reflector(s) mine is a piece of light cube (just because I already have it) but you can also take white sheets of paper or foil. You only need to make them stand in an upright position. Before having light cube I would use a roll of foil. I would just stand it and roll some amount of foil so that it reflects enough light
- Tripod. You could go without, probably. My hands are too shaky so I use tripod.
- The cord to make a picture. It’s an accessory you can easily acquire and plug in in a serious camera. It allows you to not touch the camera as you push the button. With my shaky hands and long exposure times it is a very useful device to get a sharp picture.
- Camera. Mine is SLR with ability to make RAW files.
- Light.
Sounds too easy, right? Let’s talk about things that really make it good. The reason you might need some of the following tricks is in how the cameras are designed. The modern cameras are designed to capture selfies, cats, flowers and landscapes well and they do perform well in these areas without any tricks. Bright origami on white background is not what most of the cameras would normally expect. That’s the reason they might behave really strange with the red origami ball on white background.
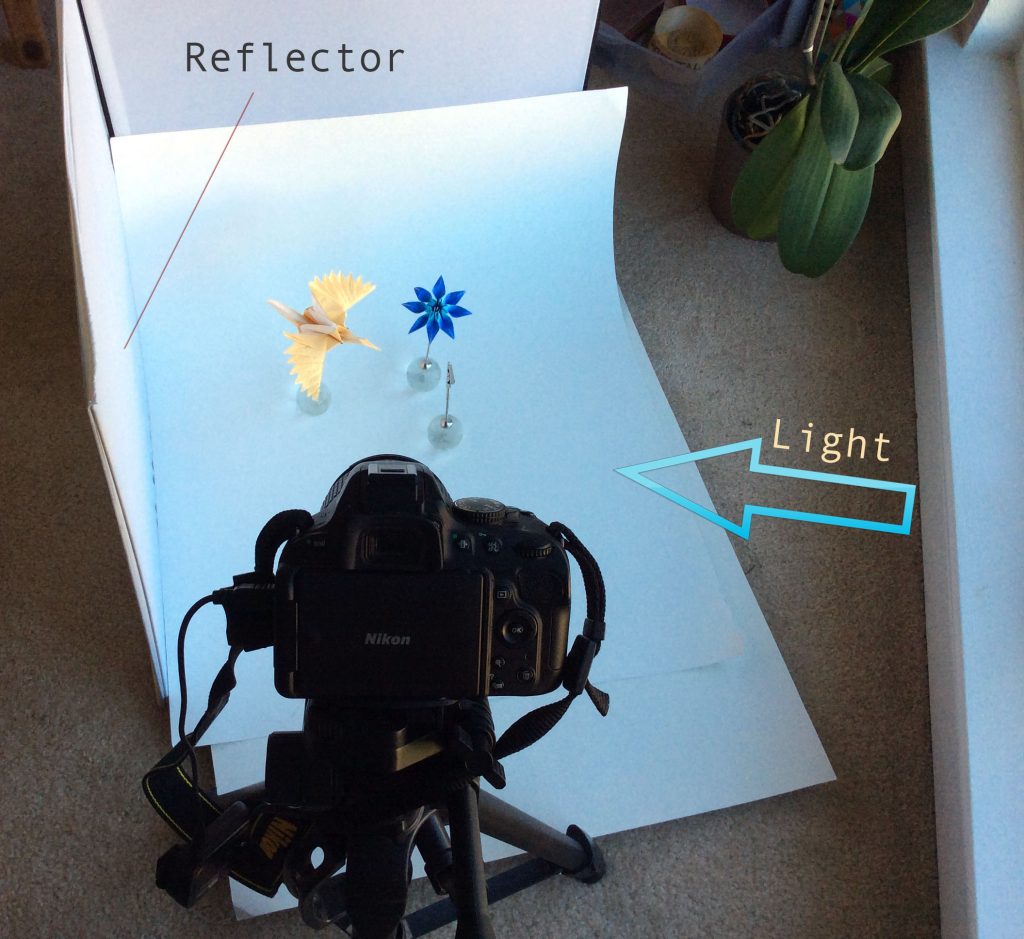
Light
Light is crucial for good origami pictures. I use natural light, reflected from the building in front of me (I have north windows). To make my origami pictures I wait for the time this building is properly lighted. If you have cloudy bright sky in front of your window it’s perfect too (that’s what I would use back in Moscow). The direct sunlight is too bright and too hard. And too yellow. The lack of light is bad.
I do have lamps in my arsenal. I bought them back in Russia, because it was too dark in winter. Or too cloudy. Or too short (northern days are short in winter). I do not use lamps now, since I am lucky to have enough natural light. Natural light is bright, uniform and easy to work with. And I would always prefer it over the lamps.
If you are still interested about the lamps… the main feature of such lamp is it’s color temperature. Our usual home lamps are too yellow to make white appear white in the pictures. The special lamps I use have color temperature of 5500K. My lamps are two 30W fluorescent lams and I can tell you it’s enough, especially if you have a tripod. You can find them in any photography shop or simply at amazon. One such lamp itself costs about $10, but you’ll also need the lamp stands or the other device where you put those lightbulbs.
Why do I need reflector?
Well, you can’t go without any reflectors, but then you will have darker shadows in your origami pictures and your origami model won’t be uniformly lighted. Removing reflecting surface would make sense if you would like to get more contrast, dramatic shadows. You can also play with the distance between the object and the reflector. The less the distance from reflector, the less you get shadows and the smoother they are.
There’s not a big deal if you don’t have any special reflecting equipment. You can try a piece of white cardboard, some kitchen foil or white textile. I do not recommend using colored surfaces for that, unless you want to get colorful reflections. For many years I used a roll of kitchen foil as a reflector.
What is RAW and why is it important?
Raw is the format of the image file, produced by the camera. Various vendors have their own names for this kind of file (Nikon calls it .nef, Canon uses .crw or .cr2 extensions). The good thing about this file format is that it contains uncompressed data, compared to .jpg files that we usually see as pictures. When a digital camera makes a picture it first produces this RAW file (even if it does not have any option to save it) and then squashes it to jpg. During this squashing the camera decides what is right and what is wrong what is white and what is black. And here we get any color of our white background, but not white. We surely can fix it later with software, but the full information is missing from .jpg file and we might get visible artifacts. We can also get bright colored shades in origami pictures, although normally shades should be somewhat grey color.
If you have uncompressed .raw file you can first decide (with software) what is white and then squash the file to jpg. This way you only cut off what you don’t really need and you won’t get artifacts. You can look at above pictures of the setups (made with tablet) and mention that the background is not white. Nor is it grey. It is blue! And I can’t make it white easily without harming the color of the origami, although all the other factors are the same: same light, background…

The above described topic starts to play a crucial role if you try to make pictures of red, orange or yellow origami. Camera just goes crazy from a red ball in the center. The camera was not designed to get this strange input without any greens or other colors, so camera thinks that it needs to add some green or blue. And you get what you get.
I won’t tell you that you can’t go the other way. You can. I did it for several years in my life. But it will be way more time consuming, than it is with RAW files. If you have one picture it won’t make any sense. If you need to make 50 origami pictures, you feel the difference.
Dirty trick
If you don’t have .raw thing and you still need to make red/orange origami pictures, here’s a trick. You get something dark green or dark blue and put it so that you get it on your picture. This way your camera does not go crazy and you won’t get this bluish background instead of white. Later you can cut off the part of a photograph containing this tricky object. Believe me, it works.
What presets should I use in my camera?
The good question. If you have a fancy camera and have no idea about those various buttons and symbols, then your first (and probably best) choice would be use automatic mode. No kidding. Modern cameras are smart enough. Some cameras would also do better if you chose so-called ‘macro’ mode, which tells your camera that it’s ok to focus on the near objects.
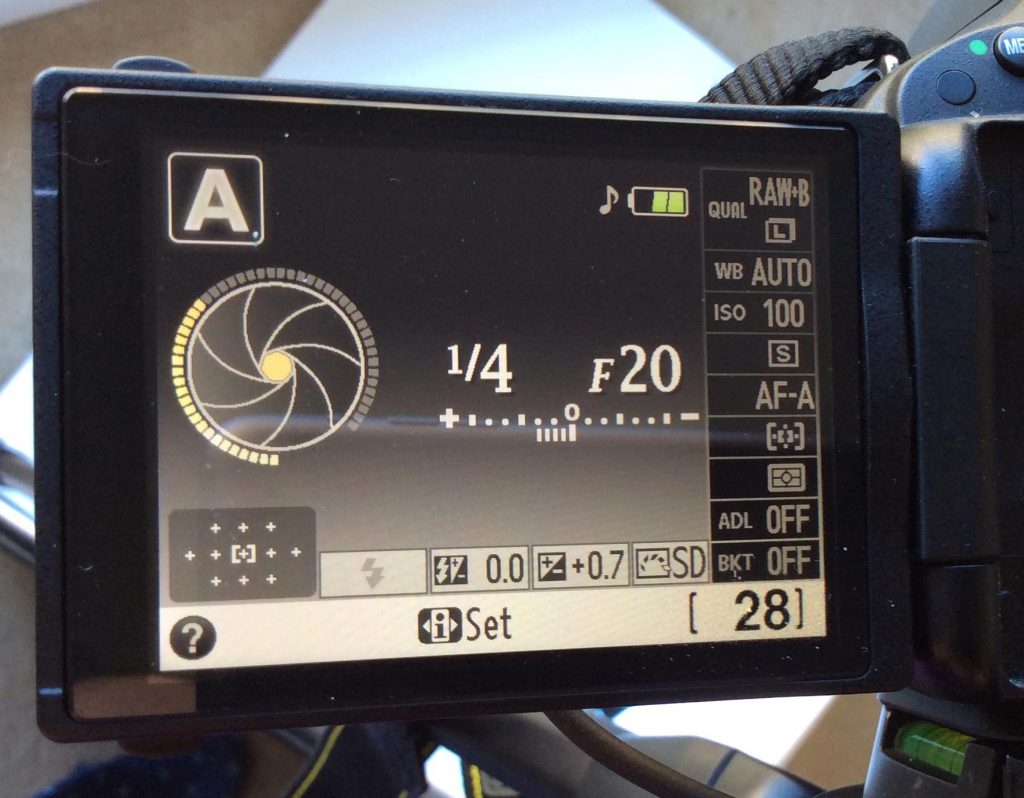
If you know what you are doing, then you can try playing with the presets. I use:
- Aperture priority mode (just because I want to get more surface of my balls in focus) with higher values (which will result in bigger focus area). Note, that this mode makes sense only if you are using a tripod. It results in long exposure times and shaky pictures in the end. This is totally ‘to taste’ thing.
- I also use expo-correction to make the overall origami pictures lighter. You can play with this parameter to see what you really like. From my experience if you set it on the camera, you get less software artefacts later. It makes sense with white backgrounds since the camera decides it’s too much light and it should not be so much light (the camera won’t know that you are making a white picture) and the camera makes it darker automatically.
- You might want to manually adjust your white point for your specific lighting conditions.
Note: If you don’t use tripod and/or cord you might get better results with setting your camera to have minimal exposure times. This reduces shaking.
How do I make this perfect whiteness in my origami pictures?
This step is fully optional and makes sense only if you need completely white borders of the picture. The latter is useful for books and for placing the picture to the white backgrounds. If you don’t need that, you might skip this part.
I use photoshop(historically). I am really sure there exists free software to do the same.
- Open .Raw file and set white point, contrast and other parameters (if you open many pictures at once you can set the parameters once and apply them to the whole set).
- I do ‘Curves’ in Photoshop. I find it faster and more convinient to separate this step from step 1. Curves modify the appearance of colors and shades. If you are making the white background picture, this is how the curves/histogram would look like.
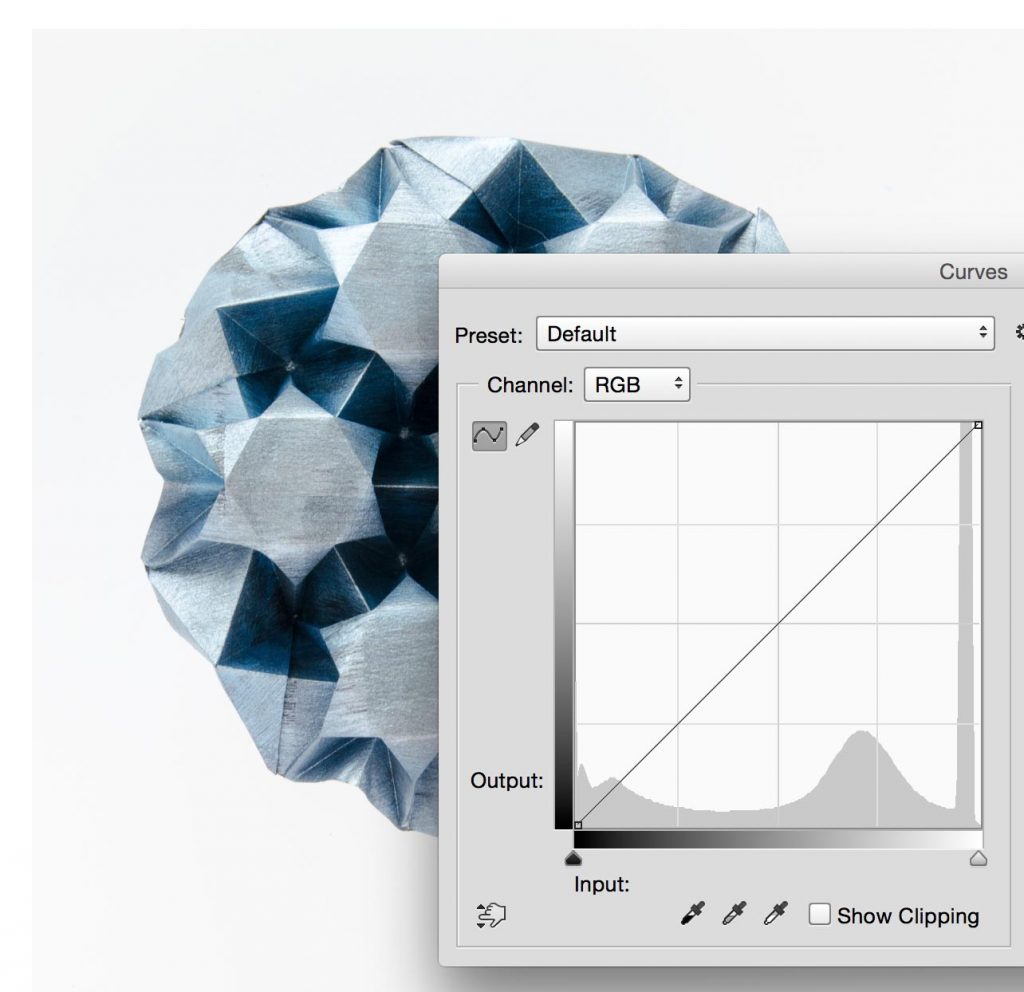
Note that the background is not white yet. I use Curves to whiten it… Camera and automatic presets would try their best to make your white background have color variation. So it is not yet, actually, white. We have to make it whiter. The big peak is actually our dirty white background. We just need to shift it to white. This will only work well if your origami creation is not white/light color itself. Otherwise you’ll lose details in your white areas, that you don’t want to lose probably.
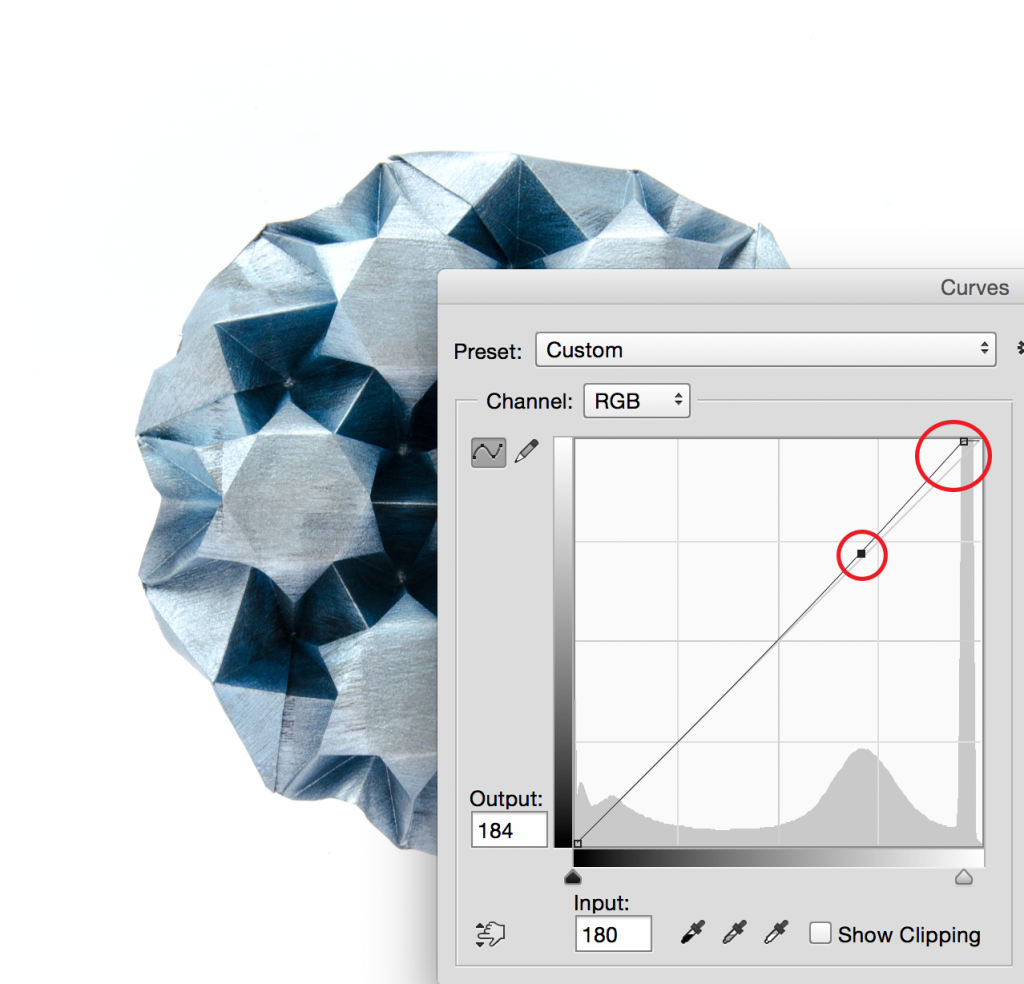
Big circle denotes the shift of nearly white shades to white. The little circle is trying to keep the image color dark (optional). - If origami picture still has uneven borders, I use ‘dodge’ tool to whiten them directly. I have big brush and mild intensity and focus towards ‘Highlights’. this way even if you occasionally touch your origami creation with the brush, it won’t be affected. The whole process takes me several seconds.

Dodge tool presets: Note the range is Highlights, Exposure is not too high and ‘protect tones’ off - (Optional) you can double check if you have white borders. Take Color Bucket, set tolerance to 0 and try to fill in the border with some bright color. If it fills, you are fine. If it’s not, undo the Color Bucket, repeat step 3.
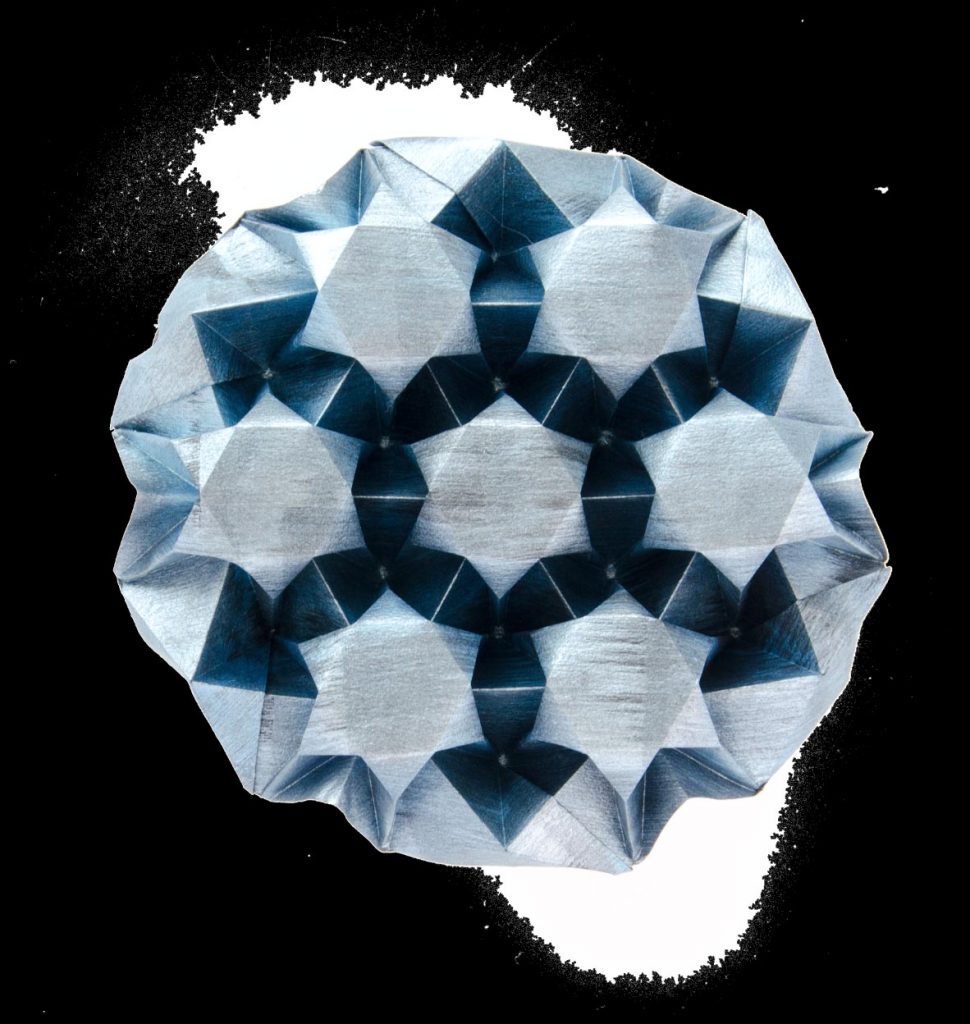
Paint Bucket was used to check if the background is white. To do that ‘Tolerance’ parameter should be set to 0. If we like the result, we simply undo this step. This picture did not undergo the step 3. Curves was enough!
Some final notes: I’d recommend to not remove the shades from origami pictures completely. You need some shades for a natural look.
PS. If you still have any questions about origami pictures, I’d encourage you to ask in comments.